こんにちは 中村です。
Intel® Arc™ A770を活用し、stable diffusionで画像生成AIを作成してみたいと思います。

環境構築
Intel oneAPIのインストール
stabel diffusionはテキストをもとに画像を生成する訓練済AIモデルです。
tensorflowやpytorchなど機械学習フレームワークは問いませんが、Intel® Arc™ A770やIntel CPU等のXPUを使用するための拡張プラグインが別途必要となります。
tensorflowを使用する場合は下記のプラグインIntel® Extension for Tensorflow が必要になります。
https://github.com/intel/intel-extension-for-tensorflow
pytorchを使用する場合は下記のプラグインIntel® Extension for PyTorch必要になります。
https://github.com/intel/intel-extension-for-pytorch
今回は汎用的でかつ簡単に実装したいのでpytorchを使用したいと思います。
OS等の環境は以下の通りです。WSLの導入等は今回省略します。
- OS windows11 22H2
- WSL2 Ubuntu20.04
拡張プラグインの導入にはIntel® oneAPI Toolkitsに含まれているDPC++ Compiler, Math Kernel Libraryが必要になります。これらはXPUの各アーキテクチャ毎に最適な数学演算をするためのライブラリとそれをコンパイルするコンパイラーとなります。
Intel® oneAPI Toolkits全体をインストールするとかなり大規模なため、今回は必要となる上記2つのみインストールします。
下記コマンドにてaptにリポジトリを追加してインストールしていきます。
sudo apt-get install -y gpg-agent wget
wget -qO - https://repositories.intel.com/graphics/intel-graphics.key | \
        sudo gpg --dearmor --output /usr/share/keyrings/intel-graphics.gpg
echo 'deb [arch=amd64 signed-by=/usr/share/keyrings/intel-graphics.gpg] https://repositories.intel.com/graphics/ubuntu focal main' | \
        sudo tee /etc/apt/sources.list.d/intel.gpu.focal.list
sudo apt-get update
sudo apt-get install \
        intel-opencl-icd=22.28.23726.1+i419~u20.04 \
        intel-level-zero-gpu=1.3.23726.1+i419~u20.04 \
        level-zero=1.8.1+i419~u20.04
sudo apt-get install intel-oneapi-runtime-dpcpp-cpp intel-oneapi-runtime-mkl
python ライブラリのインストール
次に必要となるpythonライブラリのインストールをします。
pip install torch==1.13.0a0+git6c9b55e torchvision==0.14.1a0 intel_extension_for_pytorch==1.13.120+xpu -f https://developer.intel.com/ipex-whl-stable-xpu
pip install diffusers
pip install transformers
stable diffusionの実行
実行するコードは下記になります。
XPUを使う際はライブラリをimportして変換先を”xpu”にするだけなのでとても簡単です。
from diffusers import StableDiffusionPipeline
import torch
import intel_extension_for_pytorch as ipex

model_id = "stabilityai/stable-diffusion-2-1"
pipe = StableDiffusionPipeline.from_pretrained(model_id, torch_dtype=torch.float16)
pipe = pipe.to("xpu")

prompt = "There are 2 dogs on the roof."
image = pipe(prompt, num_inference_steps=60, guidance_scale=20, width=720, height=480).images[0]

image.save("result.png")
生成された画像がこちらです。
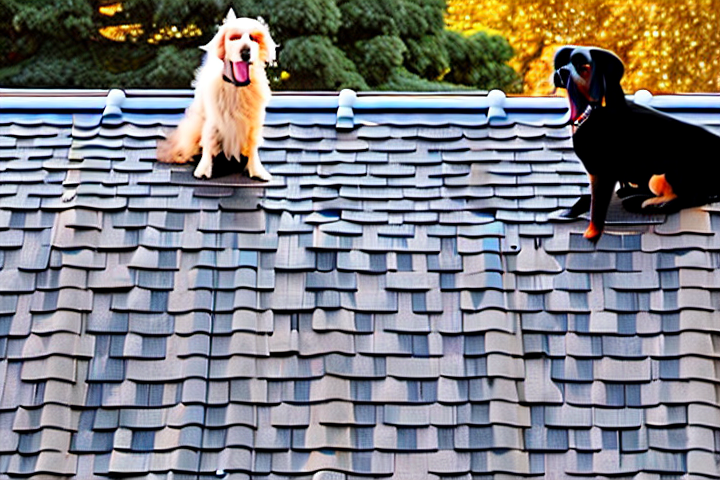
GPUは7GBほど使用していました。Intel® Arc™ A770は16GBでまだまだ余裕があるので他の推論も回せそうです。
肝心の速度は10秒ほど(推論2回目以降)で推論数(num_inference_steps)と解像度(guidance_scale)を高めに設定している割にはとても高速に動作している印象でした。
Slack連携
このままでは文章を英語にしてプログラムに送らないといけない為、AI翻訳とslack連携していきたいと思います。
AI翻訳は200言語翻訳可能なNllB-200を使用していきます。NLLBはこちらのREST APIで実装されたものを使用しました。
https://github.com/thammegowda/nllb-serve
NLLB-200の実行にはtransformersというライブラリを使用しています。Intel® Extension for Transformersという拡張ライブラリがありますが、こちらはAシリーズGPUにはまだ未対応のようなのでCPUで処理していこうと思います。今回はメモリに余裕がないので最小のNLLB-200-600Mのモデルを使用しています。
下図のようにslackに送られたメッセージを英語に変換し、stable diffusionで画像にしたのちslackで返信していきます。

ソースコードは以下になります。このほかにhttpサーバーを開くためのlocaltunnel、nllb-serverを起動して実行しています。
import requests
import os
import re
import json
from slack_bolt import App, Say, BoltContext
from slack_sdk import WebClient
import torch
import intel_extension_for_pytorch as ipex
from diffusers import StableDiffusionPipeline

client = WebClient(os.environ["SLACK_BOT_TOKEN"])
app = App()

LANGUAGE = {"jp":"jpn_Jpan", "eng":"eng_Latn", "korea":"kor_Hang", "china":"zho_Hant"}

model_id = "stabilityai/stable-diffusion-2-1"
pipe = StableDiffusionPipeline.from_pretrained(model_id, torch_dtype=torch.float16)
pipe = pipe.to("xpu")

#nllb serverへの送信
def translate(msg, from_lang, to_lang):
    EP = os.environ["NLLB_URL"]
    header = {"Content-Type": "application/json"}
    json_data = {"source":msg, "src_lang":from_lang, "tgt_lang": to_lang}
    res = requests.post(EP, headers=header, data=json.dumps(json_data))
    return res.json()

def check_lang(msg):
    j_count = 0
    e_count = 0
    for c in msg:
        if re.match(r'^[\u3040-\u30FF]+$', c) is not None:
            j_count += 1
        if j_count > 3:
            return True
    return False

@app.event("message")
def reply_in_thread(body: dict, say: Say):
    #slackメッセージの取得
    event = body["event"]
    thread_ts = event.get("thread_ts", None) or event["ts"]
    msg = event['text']
    line = msg.split('\n')
    line = [t for t in msg if t != '']

    #日本語か英語かひらがな,カタカナの数で確認
    if check_lang(msg):
        ret = translate(text, lang["jp"], lang["eng"])
        reply = ' '.join(ret['translation'])
    else:
        reply = ' '.join(text)

    #stable diffusionの実行
    image = pipe(reply, num_inference_steps=35, guidance_scale=20, width=720, height=480).images[0]
    image.save("result.png")

    #slackへのファイルのアップロード
    new_file = client.files_upload_v2(title="stable diffusion image file", file="./result.png",)
    file_url = new_file.get("file").get("permalink")
    say(text="Result Image"+"<"+file_url+"| >", thread_ts=thread_ts)

if __name__ == "__main__":
    app.start(os.environ["SLACK_PORT"])
実際にugoに似たロボットの画像生成を試みてみました。
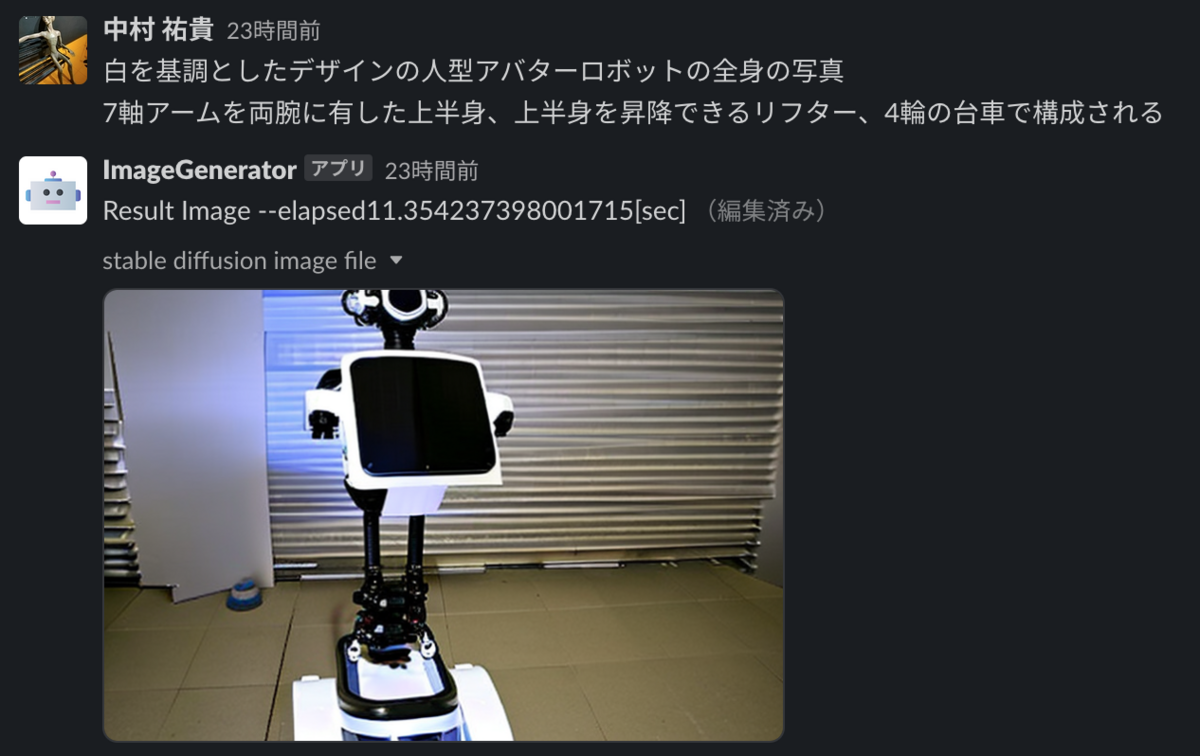
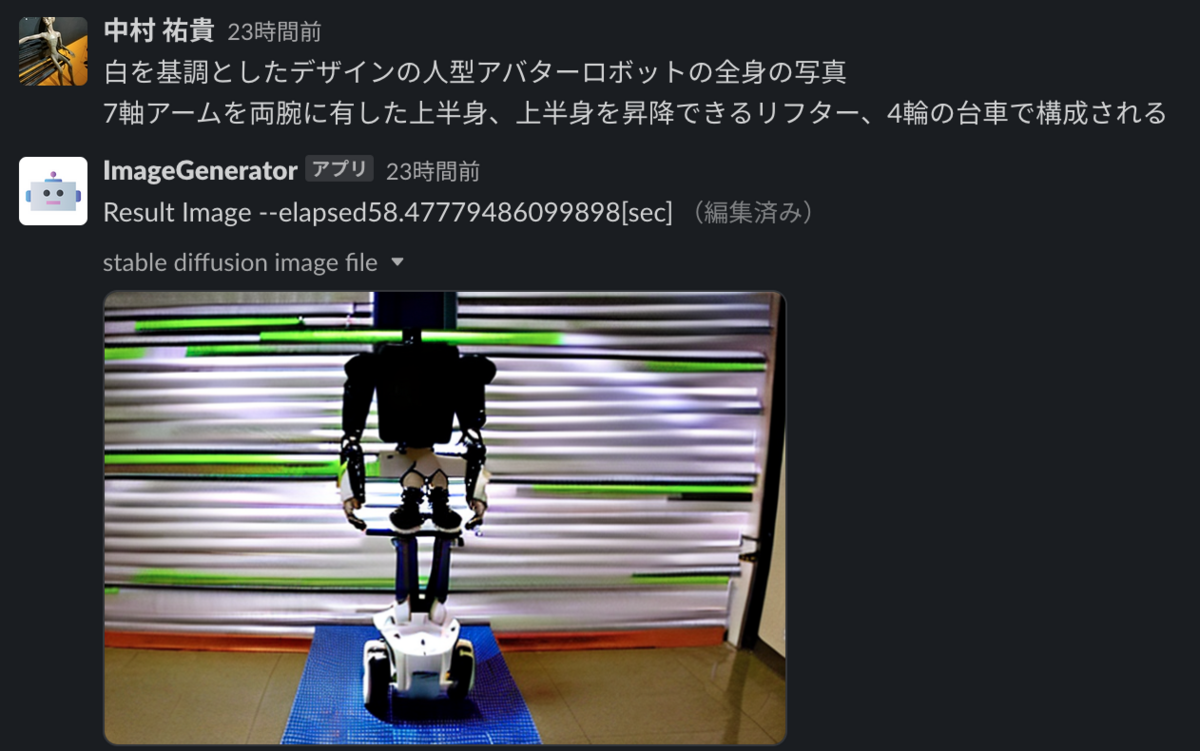
リフターの再現は難しそうですが他の特徴は捉えてますね。実際にあるロボットと言われも気づかなさそうなクオリティーですね。
おわりに
Intel® Arc™ A770は機械学習,推論をするには申し分のないスペックでした。Intel® Extension for PyTorchは将来的にPytorchのメインラインリリースに含まれる予定とのことなので、Intel製XPUを利用した機械学習が発展していくことに期待です。
弊社としてもGPUを利用してロボットに活用できそうなモデルを気軽にslackからGPU推論できるようにしていきたいと思います。
ugoでは物体検知を利用した追尾機能、ジェスチャー推定を利用したコミュニケーション機能など様々なAIを利用した機能を開発中です。
一緒にロボットを社会実装していく仲間を絶賛募集中です。 詳しくはこちら👇まで。